Some thoughts or ideas of innovative, much needed in managing the blog / site. The idea here is, how do you take action to create a tactics to attract visitors to visit your blog, so this could increase traffic.
One way will I study is to add a summary of articles that have been made before, the form of a widget and placed at the end of writing the article. But this widget is not related to the articles that are readable, which is often found on blogs / sites that have been there, called the Related Articles. Okay, we will discuss step by step how to create this widget.
I find this widget from Linkwithin.com (http://www.linkwithin.com). The widget is free and ad-free. It takes a minute to get the widget up and running on your blog, no signup required! LinkWithin is a widget that links to related stories from your archive under each story on your blog.
We retrieve and index all stories from your blog archive, not just recent stories, making them accessible to new or casual readers of your blog who would not otherwise encounter them.
The widget links to stories that are relevant and interesting to readers of a particular story, keeping them engaged with your blog, and increasing your traffic.
If you are interested, you are only prompted for the email address, link blog, Platform and check the box in front of "My blog has light text on a dark background" (If your blog with a dark background), then click the "Get Widget"
Then you will be taken on the "Install Widget on Blogger"
1. Click INSTALL WIDGET to open Blogger in a new window, and follow steps 2 and 3 in that window. Please login if necessary.
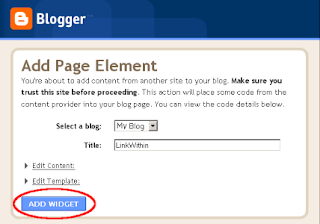
2. Select a blog if you have more than one, then click on Add Widget.

3. Click on Save. And you're done! The widget should now appear on your blog, located at the end of the articles have been written.
For the blog that have a "Main-Wrapper" is wide, and a template that is used not Magazine, the widget is not found obstruction. Because automatically, Linkwithin of widgets appear with three pictures, complete with caesura article, which does not take much space from the Main-Wrapper.
For the type of template used shaped "Magazine Template." Installation of Widgets LinkWithin, very problematic because it seems that the widget through a column that is the right of the MAIN-Wrapper. This also applies to blogs that have added "Readmore" in each of their articles. So that it is not harmonious, and the main blog page seems disorganized.
But you don't worry, I have found the solution.
After you implement the third step, then immediately to the Layout | Page Elements and click the Edit "LinkWithin Gadget."

Script code that appears is as follows:
<script>
var linkwithin_site_id = 19881;
(function () {
var elem = document.createElement('script');
elem.type = 'text/javascript';
elem.src = 'http://www.linkwithin.com/widget.js?rand=' + Math.random();
document.getElementsByTagName('head')[0].appendChild(elem);
})();
</script>
<a href="http://www.linkwithin.com/"><img alt="Blog Widget by LinkWithin" style="border: 0" src="http://www.linkwithin.com/pixel.png"/></a>
Then copy the script code in Notepad.
After that, you click on Edit HTML, and then check the "Expand Widget Templates" .
Use Control F to search for the code:
<b:widget id='HTML5' locked='false' title='LinkWithin' type='HTML'>
<b:includable id='main'><data:content/></b:includable>
</b:widget>
Then copy the script code in Notepad. After you copy the two scripts above, please remove the code, do confirm and save.
Of the two scripts that you copy, you can change into a single script that appear similar to this:
<b:if cond='data:blog.pageType == "item"'>
<div class='widget-content'>
<div expr:id='"main" + data:content.id'><data:content/></div>
<script type='text/javascript'>
var linkwithin_site_id = 19881;
(function () {
var elem = document.createElement('script');
elem.type = 'text/javascript';
elem.src = 'http://www.linkwithin.com/widget.js?rand=' + Math.random();
document.getElementsByTagName('head')[0].appendChild(elem);
})();
</script>
<a href="http://www.linkwithin.com/"><img alt="Blog Widget by LinkWithin" style="border: 0" src="http://www.linkwithin.com/pixel.png"/></a>
</div>
</b:if>
After that, you click on Edit HTML, and then check the "Expand Widget Templates" .
Use Control F to search for the code:
<div style='clear: both;'/> <!-- clear for photos floats -->
Add the code that the script has been modified, before the code above.

Hopefully helpful


3 comments:
Mas, lagi2 pertanyaannya, berlaku utk blogspot sajakah ?
Cool tutorial bro, Thanks For sharing....Keep posting..
I have find a quick and easy to install and customize Recent Post Widget with thumbnails. You can install it in minute with hassle-free complicated manual code installation.
You may look at this link for more information : http://www.engadgeteer.com/2009/07/recent-posts-widget-with-thumbnails.html
Post a Comment