Wednesday, June 10, 2009

Relaxing at the weekend


On Sunday, June 07, 2009 together with my family present at the event "Children's Day Care" in the field, not far from my home.

The event is held in order to give attention to the children of soldiers marine. This event was entertained by Ria Anes, which is always a pair with its beautiful dolls, local band, competitions knack for children, and scholarships for their achievement in school.

Events concerned with this child soldier, held almost every year.
At this event, they introduced with the military equipment that is usually always used by their father.


With their parents each, they seem to enjoy the weekend with joy. They can freely jig, power think they wreak on the canvas, the style vehicle combat and a lot of various games that they can enjoy. This event is not wasted by their parents, to perpetuate with their digital photos, to the actions of their children is funny.

They were very enthusiastic to follow all the races held at the event.

With this event has been held, it is expected that children can be consoled.
»»  read more

Friday, June 5, 2009

jQuery Scroll to Top Control v1.1

A blog page / site will sweep down. Moreover, the articles you write on the blog / site does not use Readmore. Of very tired when we have to scroll manually. If the page blog / site you lengthy, it's a good idea to provide viewers with an easy way to quickly / automatically scroll back to the top of the page.

Adding script with jQuery Scroll to Top Control v1.1, the control will display a stationary in the lower right corner of the window carefully when clicked on the page Scrolls back to the top. At times this practice, I use the arrow icon that I attach the script at jQuery before uploading Geocities.yahoo.com.

Please note that in addition to displaying stationary control, you can also specify a random anchor link on the page with the href value of special (ie: # top), which when clicked and the script Scrolls back to the top of the page.

Scroll to the bottom of the page (at least 100 pixels) to view a "Back to the Top" controls appear at the bottom right window, as in the Ayomaos this.

If you do not want to modify this script, then you just copy the code below:

<script type='text/javascript' src='http://ajax.googleapis.com/ajax/libs/jquery/1.3.2/jquery.min.js'></script>

<script type='text/javascript' src='http://www.geocities.com/nataludin5/scrolltopcontrol-1.js'>

/***********************************************
* Scroll To Top Control script- © Dynamic Drive DHTML code library (www.dynamicdrive.com)
* This notice MUST stay intact for legal use
* Visit Project Page at http://www.dynamicdrive.com for full source code
***********************************************/

</script>

Then add the script after <head>


If you are not satisfied with my modifications, you can adjust various things, such as the amount of time the backup script is required to scroll to the top, with the duration of fade in / out effect to control in scrolltopcontrol.js file, here is the relevant section to be modified :
setting: {startline:100, scrollto: 0, scrollduration:1000, fadeduration:[500, 100]},
controlHTML: '<img src="up.gif" style="width:24px; height:24px" />', //HTML for control, which is auto wrapped in DIV w/ ID="topcontrol"
controlattrs: {offsetx:15, offsety:15}, //offset of control relative to right/ bottom of window corner
anchorkeyword: '#top', //Enter href value of HTML anchors on the page that should also act as "Scroll Up" links
For "controlHTML", you can enter any HTML you want displayed as a control, but it must be something simple, such as an<img>, or even just plain text. Sample the following anchors in the HTML page also scroll the page back to top:

<a href="#top">Back to Top</a>

If you are not clear with my explanation, please visit at: http://www.dynamicdrive.com/dynamicindex3/scrolltop.htm
»»  read more

BLOGtoPROFIT

For you who like to make money online program, especially paid review, there is one of the service review the rather easy to follow, namely BlogtoProfit.
BlogtoProfit seems very easy to follow, just BlogtoProfit require that the blog must have registered their own domain.

Conditions blog that will be submitted to BlogtoProfit.

1. The blog must be at least 2 months old with original, quality content and updated at least twice per week.

2. Blog must use the English language.

3. Should be the primary domain, for example, domain.com, you can not use http://www.domain.com/myblog, but you can use a subdomain, for example http://myblog.domain.com. Notes to this point, they did not receive a general subdomain such as blogspot, freehosting, and the like.

4. Blogger will be notified when the blog is approved. But may be re-evaluated after 2 months.

5. Blogs should have a clear Permalink structure.

6. Blog at the time of registering the domain near the expiration time, will be rejected.


Once your blog is approved, the BlogtoProfit will provide 3-4 jobs at once. Later they will give you the code plus web link which should be reviewed. Terms of review must be submitted through their email notification when a job review.

Terms of review:
  • Must use the English language.
  • Content must be positive, free from pornography.
  • At least 150 words
  • Only one link per post review
  • Content must be creative, do not copy from other sources.
  • Never make a review under the category sponsor, review, and the like.
  • Anchor text is not allowed nofollow, URL and Anchor text should be in accordance with the given
  • The link should be in the post
  • Your blog post must remain live for at least 12 months and can be accessed via the link still be submitted at any time in the time period agreed upon. Blogger delete posts that are paid after the term ends and before the above will no longer accept sponsorship opportunities, and may be prohibited from BlogtoProfit.
»»  read more

Saturday, May 30, 2009

Related posts widget with photo thumbnails


Some thoughts or ideas of innovative, much needed in managing the blog / site. The idea here is, how do you take action to create a tactics to attract visitors to visit your blog, so this could increase traffic.
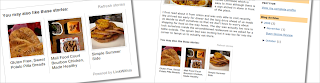
One way will I study is to add a summary of articles that have been made before, the form of a widget and placed at the end of writing the article. But this widget is not related to the articles that are readable, which is often found on blogs / sites that have been there, called the Related Articles. Okay, we will discuss step by step how to create this widget.

I find this widget from Linkwithin.com (http://www.linkwithin.com). The widget is free and ad-free. It takes a minute to get the widget up and running on your blog, no signup required! LinkWithin is a widget that links to related stories from your archive under each story on your blog.
We retrieve and index all stories from your blog archive, not just recent stories, making them accessible to new or casual readers of your blog who would not otherwise encounter them.
The widget links to stories that are relevant and interesting to readers of a particular story, keeping them engaged with your blog, and increasing your traffic.

If you are interested, you are only prompted for the email address, link blog, Platform and check the box in front of "My blog has light text on a dark background" (If your blog with a dark background), then click the "Get Widget"

Then you will be taken on the "Install Widget on Blogger"

1. Click INSTALL WIDGET to open Blogger in a new window, and follow steps 2 and 3 in that window. Please login if necessary.

2. Select a blog if you have more than one, then click on Add Widget.
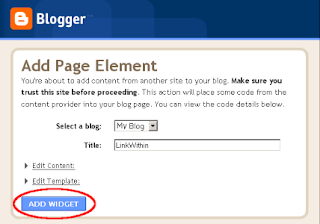

3. Click on Save. And you're done! The widget should now appear on your blog, located at the end of the articles have been written.

For the blog that have a "Main-Wrapper" is wide, and a template that is used not Magazine, the widget is not found obstruction. Because automatically, Linkwithin of widgets appear with three pictures, complete with caesura article, which does not take much space from the Main-Wrapper.

For the type of template used shaped "Magazine Template." Installation of Widgets LinkWithin, very problematic because it seems that the widget through a column that is the right of the MAIN-Wrapper. This also applies to blogs that have added "Readmore" in each of their articles. So that it is not harmonious, and the main blog page seems disorganized.
But you don't worry, I have found the solution.

After you implement the third step, then immediately to the Layout | Page Elements and click the Edit "LinkWithin Gadget."
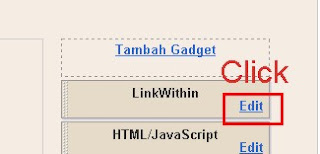

Script code that appears is as follows:
<script>
var linkwithin_site_id = 19881;
(function () {
var elem = document.createElement('script');
elem.type = 'text/javascript';
elem.src = 'http://www.linkwithin.com/widget.js?rand=' + Math.random();
document.getElementsByTagName('head')[0].appendChild(elem);
})();
</script>
<a href="http://www.linkwithin.com/"><img alt="Blog Widget by LinkWithin" style="border: 0" src="http://www.linkwithin.com/pixel.png"/></a>

Then copy the script code in Notepad.

After that, you click on Edit HTML, and then check the "Expand Widget Templates" .
Use Control F to search for the code:
<b:widget id='HTML5' locked='false' title='LinkWithin' type='HTML'>
<b:includable id='main'><data:content/></b:includable>
</b:widget>

Then copy the script code in Notepad. After you copy the two scripts above, please remove the code, do confirm and save.
Of the two scripts that you copy, you can change into a single script that appear similar to this:

<b:if cond='data:blog.pageType == "item"'>
<div class='widget-content'>
<div expr:id='&quot;main&quot; + data:content.id'><data:content/></div>
<script type='text/javascript'>
var linkwithin_site_id = 19881;
(function () {
var elem = document.createElement('script');
elem.type = 'text/javascript';
elem.src = 'http://www.linkwithin.com/widget.js?rand=' + Math.random();
document.getElementsByTagName('head')[0].appendChild(elem);
})();
</script>
<a href="http://www.linkwithin.com/"><img alt="Blog Widget by LinkWithin" style="border: 0" src="http://www.linkwithin.com/pixel.png"/></a>
</div>
</b:if>

After that, you click on Edit HTML, and then check the "Expand Widget Templates" .
Use Control F to search for the code:

<div style='clear: both;'/> <!-- clear for photos floats -->

Add the code that the script has been modified, before the code above.
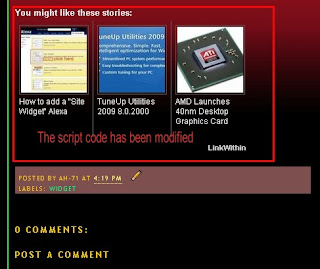

Hopefully helpful
»»  read more

Tuesday, May 26, 2009

Google Chrome browser gets ‘V8′ engine

Google Chrome is a browser that combines minimal design with sophisticated technology that can be accessed with the Web faster, safer, and easier.
About 8 months since launch of Google Chrome, after users have sent a lot of input and demand features, Google has finally focused on increasing the speed and also add some of the features most often requested. Some of the improvements made in the first Beta version was released in March continues to be improved, so that from the Beta version has become a stable channel for all users to enjoy.

Here are some improvements that can be enjoyed by fans of the Google Chrome browser:

Improved New Tab Page:

The most requested feature from users was the ability to remove thumbnails from the New Tab page. Now you can finally hide that embarrassing gossip blog from the Most Visited section.

Full Screen Mode:

If you've ever given a presentation or watched a large video using Google Chrome, you might have wished you could use every last pixel on your screen for the content. Now you can hide the title bar and the rest of the browser window by hitting F11 or selecting the option in the Tools menu.

Form AutoFill:

Filling out forms in your information over and over again can be tedious. Form AutoFill helps by showing you've Previously entered information into the same form fields automatically. If at any point you want to clear out your information, that's easy to do from the Tools menu.

And here are some improvements that are not immediately visible, but will make web browsing with Google Chrome more enjoyable.

Increased Stability:

Google Chrome is more stable than, than at the beginning of the launch of which still have more than 300 bug that caused crash

Increased Speed:

For the new version and with the updates to WebKit JavaScript engine V8, interactive web page will run faster, even if you have many tabs open. The V8 JavaScript engine has been designed for scalability. V8's approach to scalability is to use generational garbage collection. The main observation behind generational garbage collection is that most objects die either very young or are long-lived. There is no need to examine long-lived objects on every garbage collection because they are likely to still be alive. Introducing generations to the garbage collector allows it to consider only newly allocated objects on most garbage collections

If you already use Google Chrome, it will be automatically updated to this new version immediately. If you want to try this soon, you can get the latest version at google.com / chrome.


Source:

http://blog.chromium.org/2009/05/scaling-javascript-to-large-web.html
http://chrome.blogspot.com/2009/05/speedier-google-chrome-for-all-users.html

Download GOOGLE CHROME
»»  read more

Monday, May 25, 2009

Adsense permanent, in the Credit-footer

When you visit on this blog, try to look carefully. Especially on the bottom, from Ayomaos this. In the right corner of the part, you can see the Adsense with size 468px X 60px installed permanently. Meanwhile in the bottom left corner, is the creator of the template Ayomaos and some information associated with the template AYOMAOS. I call this section with the name of Credit-Footer.

This step is also a part of how to manage your blog to make money from Google Adsense. Adding code from Adsense, do not have to be on the sidebar, in the article, or in part before / after the header. We can add Adsense on where we want, which is not in violation of rules set by Google.
As I have been doing, that is I have put Adsense at the bottom of Ayomaos, with a fixed position. In the sense that, at the time Ayomaos visitors do scroll, Adsense does not change position and do not disappear.


Are you interested in the steps I have been doing on Ayomaos? Try to follow the step by step, how to install credit-footer in your blog.
The first step, please backup your template. Do not tick the "Expand Widget Templates"
Then search the code ]]></ b: skin>. Add the following code before ]]></ b: skin>.

#credit-footer p.credit {
float: right;
padding-right:10px;
line-height: 1.2;
height: 100%;
vertical-align: bottom;
}

#credit-footer p {
float: left;
margin: 0px;
padding: 7px 10px 5px 5px;
vertical-align: bottom;
line-height: 1.2;
}
#credit-footer a {
color: #FFFFFF;
}
#credit-footer {
align: center;
position: fixed;
border-top: 3px solid #ffffff;
background: #000000;
left: 0px;
text-align: left;
width: 100%;
color: #FFFFFF;
font-family: Verdana;
font-size: 11px;
bottom:0;
}

Steps that you should do next is find the code </ body>.
Add the following code before the </ body>.

<div id='credit-footer'>
<p>
&lt;p&gt;<data:blog.pageTitle/><br/>Copyright:19052009 | &lt;a href=&#39;http://www.nataludin.com&#39;&gt;www.nataludin.com&lt;/a&gt; | <a href='#header'>Top</a><br/>Has been modified by &lt;a href=&#39;http://www.nataludin.com&#39;&gt;NATALUDIN.COM&lt;/a&gt;<br/> Thank&#39;s for : Blogger | Photobucket | Picassa</p>

<p class='credit'>
&lt;script type=&quot;text/javascript&quot;&gt;&lt;!--
google_ad_client = &quot;pub-7181952237540333&quot;;
google_ad_host = &quot;pub-1599271086004685&quot;;
/* 468x60, created 11/26/08 */
google_ad_slot = &quot;6911967720&quot;;
google_ad_width = 468;
google_ad_height = 60;
//--&gt;
&lt;/script&gt;
&lt;script
src=&quot;http://pagead2.googlesyndication.com/pagead/show_ads.js&quot; type=&quot;text/javascript&quot;&gt;
&lt;/script&gt;
</p></div>

Please change your own according to your taste, of course you also need to change the adsense code samples that have been there, with your own adsense code.
With this tutorial, I hope can help in maximizing efforts to increase our adsense earnings.
»»  read more

Saturday, May 23, 2009

Efforts to find the money through blog

Discuss how to get money solutions through blogs, are not secret anymore. Not only the bloggers that have been experienced, even to recognize the blog just a day, already imagine about how to find the money through a blog that was created by them.

Finding money in the blog, or with known Monetize Blog, is a way how they function to maximize their blog with the purpose of getting money. Many programs that they can follow, in making money on each blog that they have.

Programs such as Paid To Review (PTR), which is how it works is a review of a site from the advertiser in the form of articles, in which included a link that leads to the site's advertisers. Some of brokker Paid to Review, such as: Blogsvertise, SponsoredReview, Reviewme, Linkworth and others can be followed by the blog / site. But not what we imagine.

Because they provide the requirements that must be fulfilled, before the blog / site is approved to join them. The requirements to be able to join with them, are: age blog at least three months, has a high PageRank, use grammar correctly, traffic is a lot of visitors and others.
If you already have a requirement that has been set, the blog / site that you list will be approved. After that you will have the task of reviewing the products offered by the advertiser.
In review, there are several requirements that must be obeyed. Among them are, can not copy an article from the site of the advertiser or other sources, at least 200 words, add a link on the keywords that have been requested by the advertiser.
If the results of your review is approved, the money will go to your Paypal account. But sometimes you have to repeat your review, when in fact what you review, will not suit the advertiser.

Another case with Paid To Click (PTC), this program can be followed by anyone and does not need to have the blog. We also do not need to write a review article about a product from the advertiser. We only have to click the ad, then wait a few minutes according to regulations.
We can register at the BUX-Net, BUX-gs, Vinefire, AdSense and many more, if you want to join, become members.

Differences between the two programs are in terms of income earned money. A clear, Paid To Review generate more money from the PTC. To be able to get money from blog / site, please select your. Joined the PTR or PTC, it's up to you. Depending on your ability to manage in the blog / site that you have created.
»»  read more

Friday, May 22, 2009

Place Meta Tags on Blogger

Meta tags are how important the information on Search Engine, a page of information about the website, There are many meta tags appropriate with the standard HTML 4.0 from the World Wide Web Consortion, but actually genuinely used by the search engine only description, keyword, and robots.

The Meta Description Tags

The Meta description tag is used to give an overview about the contents of your web page. Size is recommended no more than 200 characters. And try that this description can be a sentence that is located in the early pages of the web page.

Some search engines such as Google and Nothern Light does not use meta description tags as search results. They use is the beginning of the sentence on the page.
That is why I recommend that you use the contents of the meta description tag as a sentence opener.

The Meta Keywords Tag

The Meta Keywords Tag is very important presence, because determining what keywords to find the web page on the search engine. Basic format of the meta tag is a keyword as follows:

<meta name="keywords" content="keyword1 KEYWORD2 keyword3 ...">

or who have also written with a comma separator:

<meta name="keywords" content="keyword1, keyword2, keyword3, ...>

Both work the same and there is no impact on the search engine. The purpose of use commas keywords that are easier to read. To note here is do not repeat a word more than 3 times, because it will be considered spamming. Examples of meta tag keywords that are wrong:

<meta name="keywords" content="domain, free domain, best domain, expired domain">

Seen here that the word "domain", repeated more than 3 times.

That is not less important the keyword is not the keyword that does not make a connection with the content of your web page.


The Meta Robots Tags

The main objectives of robots meta tags is to define a web page which can index by a spider and web pages which do not. Tags This is a very useful one, especially if something website uses frames to navigate. Of course we do not want to display menus in the frame to be read by search engines.
Basic format of the robots meta tag is as follows:

<meta name="robots" content="index | noindex | follow | nofollow">

For example, if you want to read the spider main page, and all the links that have then add the following:

<meta name="robots" content="index follow">

With this command, the spider will index your main page and schedule to record the pages that can be searched through a hyperlink (<a href="">).

This command will instruct spider that does not record or track an existing link on a web page.

<meta name="robots" content="noindex nofollow">

Then, how to install Meta Tags on Blogger:

To install the Meta tags diBlogger is quite simple, first go to Edit HTML and then copy and paste the code below, the code meta tags are usually placed under the code

<title> <data:blog.pageTitle/> </ title>

<meta content='write your description' name='description'/>
<meta content = 'keyword1 keyword2 keyword3 ...' name = 'keywords' />
<meta content='INDEX, FOLLOW' name='ROBOTS'/>
»»  read more

Wednesday, May 20, 2009

Domain for Ayomaos

Several days ago, I confused search for a suitable domain for "Ayomaos", which I have already made. Almost three years, I manage some free blog hosting with Blogger.

At first, I try to buy a domain that has been recommended by google, including Blogger.
After learning that there is a tutorial, actually very satisfactory, when we buy a domain that has been recommended by Google. We do not need to be bothered to make changes on the domain blog that already exists.

But be lamented is, when I see the facilities do not support Paypal payment, my intention to eventually purchase a domain that has been recommended by Google, I cancel.

I tried to contact Mrs. Ani to ask where she purchased the domain for the blog. Recommendations have been given the lead to cybercoral.com ( http://order.cybercoral.com/index.php ), which is managed by Mr Izmu (Batam).


After long thinking, I finally concluded that better results from the purchase of Indonesian people, and that means I have supported the development of Human Resources of Indonesia.

Through Yahoo Messenger, I get a step-by-step guide to buying a domain at the same time apply to the blogger.

According to my personal, very good for Order.cybercoral.com recommended as a solution looking for Web Hosting and Domain. Both in terms of price offered and service provided to customers. Information that has been outstanding, said that to set up the domain in blogger takes 24 hours, even up to 48 hours. But in Order.cybercoral.com, I only take 3 hours, it also caused a slow internet connectivity even damaged. Service payments through Paypal is the reason why I purchased the domain on the site.

So if you're looking for webhosting / domain, I recommend that you buy in Order.cybercoral.com. I guarantee that you will get satisfaction, because Order.cybercoral.com serve customers with a friendly and satisfying.
»»  read more
Adsense Indonesia ads ads ads

Recent Comment

Follower

My friends

[A] • Abryan • Agnoe • Anied • Antiqueall [B] • bidikCOM • Budiawan H [C] • Catalog Tutorial [D] • Destiny • Djemari Ijal • Dorothy L [E] [F] [G] • Gemmasnewworld [H] • HEALTHINFO@EarthyMe [I] • iEn Muncet • Ihsan's Blog • Ikma Malaysia [J] [K] [L] [M] [N] • Nuranuraniku [O] • O-Range [P] [Q] [R] • Robbie's Blog [S] [T] • tiriBC • True Pillager [U] [V] [W] [X] [Y] [Z]